Baked Falafels in Home made Whole Wheat Pita pockets
My husband and I first tried Greek food, on one our trips in Wisconsin, Madison.

Method
My husband and I first tried Greek food, on one our trips in Wisconsin, Madison. We were so surprised in the use of spices and cooking methods that were very similar to India cooking. I have always wanted to make home-made falafels, but the thought of frying these, always kind of held me back. When I saw the recipe for 'baked falafels' @ Aipis US Masala here, I bookmarked these immediately. The changes I made are to use green garbanzo beans as opposed to regular garbanzo beans, as I liked the buttery taste of these green pearls.
I searched for whole wheat pita bread, in my local grocery store and the two times I went to the store, they only had white flour ones, and no whole wheat pitas. I figured, since I am baking the falafels, I might bake the pitas as well. This is probably one of the most tastiest decisions I have made. This recipe is from Star chef Emeril. I have made these pita breads a couple of times now, and they are fool proof and absolutely delicious. I have used chapati atta to make these, and since the flour is ground super fine, it makes for super tender pitas.
Baked FalafelsIngredients:
2 cups frozen green garbanzos
2 cloves garlic
1/4 cup cilantro, chopped
2 tbsp mint, chopped
1 small onion, chopped
1 green chilly, minced
1 tsp cumin powder
1 tsp coriander powder
1/4 tsp turmeric powder
1/4 tsp chilli powder
1/4 tsp garam masala
1 tsp lemon juice
2 tbsp whole wheat flour
1 tsp baking powder
Non stick cooking spray
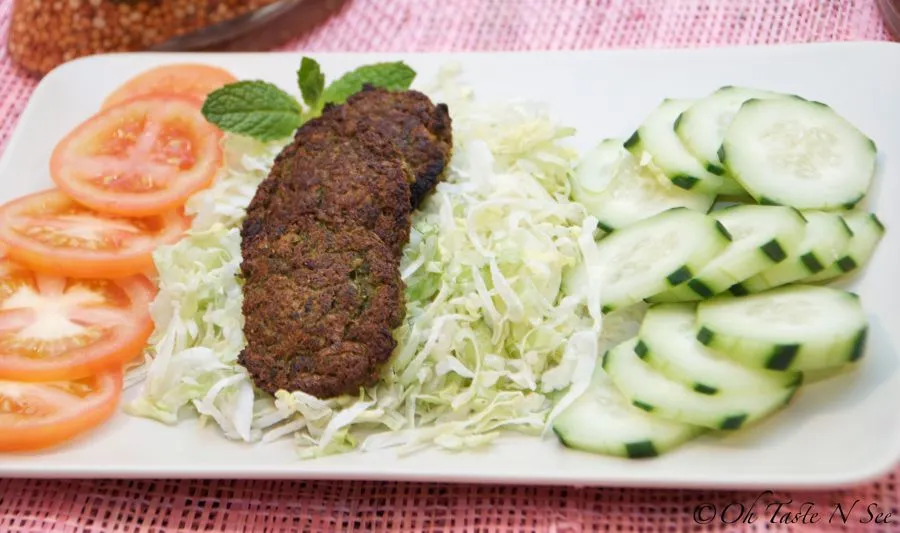
Start off by thawing the green garbanzo beans in the microwave for a couple of minutes. Add all the ingredients into a bowl of the food processor and pulse until it all comes together, but still has a coarse texture. Take a piece of the mixture and make a fist to see if it holds together. If it doesn't pulse in the whole wheat flour to help hold it together.
Preheat oven to 400 degrees. Line a baking sheet with foil and spray generously with non stick cooking spray.
Form the mixture into patties and place on the tray. Bake on one side for about 15-17 minutes. Flip, spray again with cooking spray and bake for anohter 10-15 minutes, until browned and crisp.
Let cool a bit before stuffing into the pitas.
Home Made Whole wheat pita pocketsIngredients:
1 ½ cups warm water
1 pkg active dry yeast
1½ tbsp extra virgin olive oil, plus 1 tbsp, plus extra for brushing
1 tsp honey
3 cups whole wheat flour, plus more for dusting
1 1/2 tsp salt
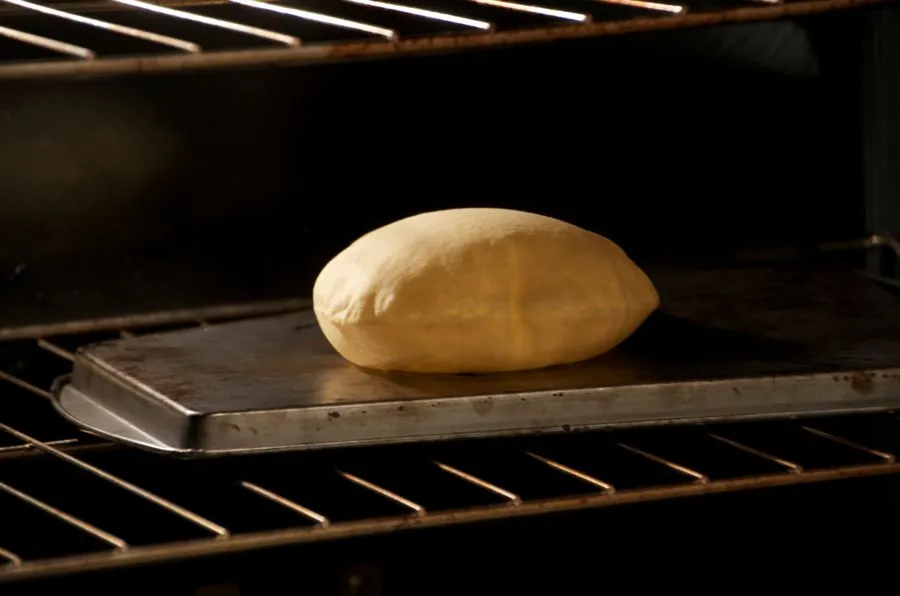
Pour water into a bowl and microwave for about 30 seconds. Stir and check to see if it is lukewarm by dipping your finger in it. Add yeast, olive oil and honey. Allow yeast to bloom until it begins to foam, about 5 minutes. Add flour, then salt. Mix it in and knead until you have a round, smooth, elastic dough. Pour 1 tablespoon of olive oil into a medium sized bowl. Place dough into bowl and coat with the oil by turning over. Cover with a clean damp towel or plastic wrap and place in a warm spot in the kitchen, until the dough doubles in volume, usually about 2 hours.(I made these in the winter and had to set it out for up to 4 hours)
Position an up-side down 18 x 13 aluminum sheet pan or a baking stone on the middle rack in the oven.
Preheat oven to 500 degrees F.
Knead the proofed dough again before dividing into 16 pieces and shape into balls. Cover with a clean towel and allow to proof until expanded slightly in size, about 20 minutes.
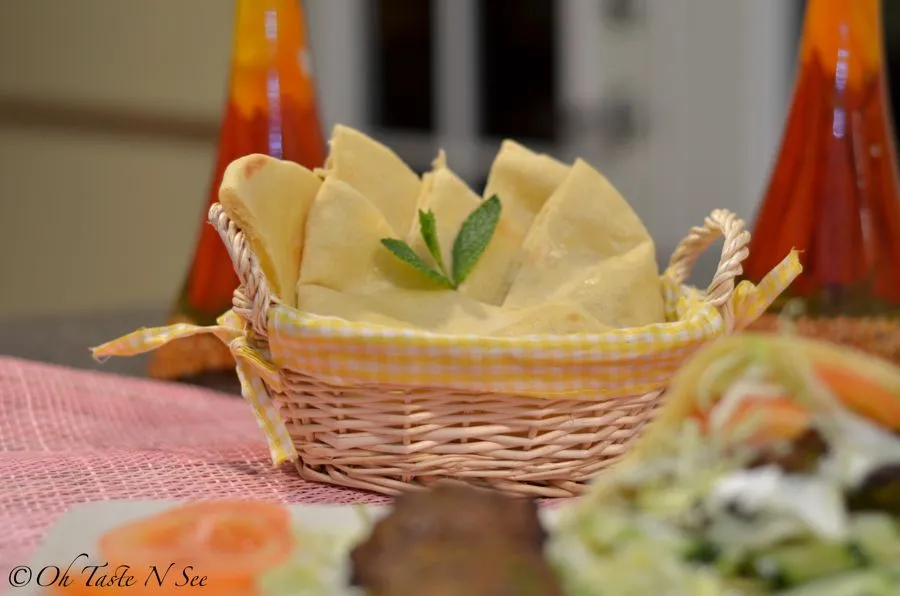
Dust a clean work surface with all-purpose flour. Roll dough into 6-inch circles. You may stack them between parchment paper or clean towels. Carefully and quickly place them in the oven directly on the baking sheet or stone. You may bake 2 or 3 at a time. Cook pitas for 2 minutes or until puffed. Remove with a metal spatula. Brush with olive oil. Repeat with remaining dough. Serve hot or at room temperature.
If making pita pockets, slit in the middle or at the 3/4th mark with a sharp knife and gently seperate the two layers to form a pocket. This process is easier when the pitas are fresh out of the oven.
Once cooled, pitas may be stored in a re-sealable plastic storage bag for up to 2 days.
Alternatively, the dough may me made a day ahead. After the dough has been kneaded and put into the bowl with the olive oil, place it into the refrigerator to proof overnight. The next day, pull dough from the refrigerator and allow it to sit at least 2 hours before proceeding with the recipe. I have also tried out this method, and it has worked equally good.
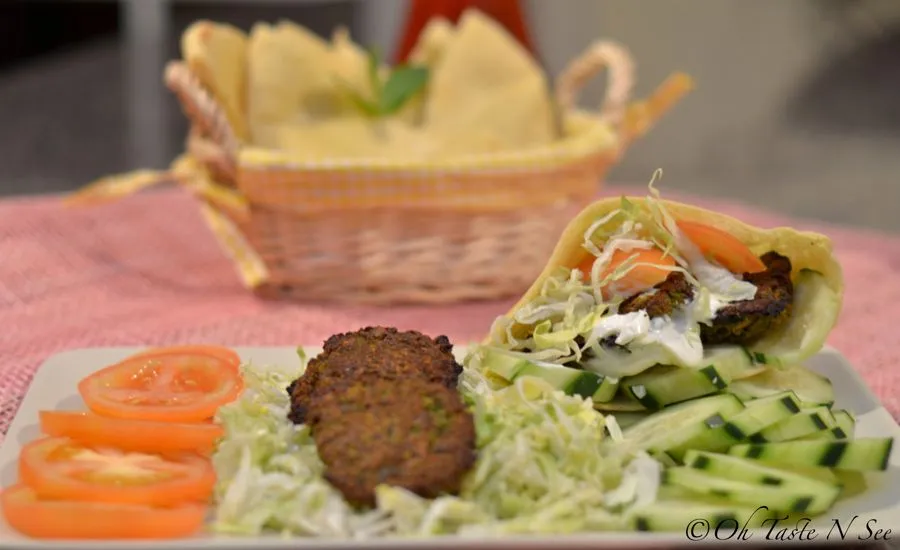
To assemble the sandwiches
1 cucumber, sliced
Tomatoes, sliced
Shredded lettuce
lemons, cut into quarters
hummus
sour cream
Split the pitas to form pita pockets, stuff with cucumber, tomatoes, lettuce - top with the hummus or sour cream, squeeze a bit of lemon and enjoy!
Verdict: Although this post is lengthy, making this was quite a breeze. I really enjoyed the baked falafels, and except for the ones in the picture, munched on them even before it got into the pitas. (the cook gets to taste, :) thats one of the best perks of it). The pitas were sooooo soft and tender, I am never buying store bought pita again. They tasted good until the next day. When stuffed with the falafels and the condiments, it made for a healthy and very filling meal. My husband called it baked puri, and that is exactly how it tasted. Awesome!Yet Healthy! - Now thats two words you love in a sentenceSending these to the following events:1. 19th Mediterranean cooking event - Greece2. My Legume Love Affair #34, event series by Susan

3. Yeastspotting and4. Souper Sundays @ Kahakai Kitchen
Sending the Baked falafels to 'Healthy Appetizers' event.


Comments
Loading comments…