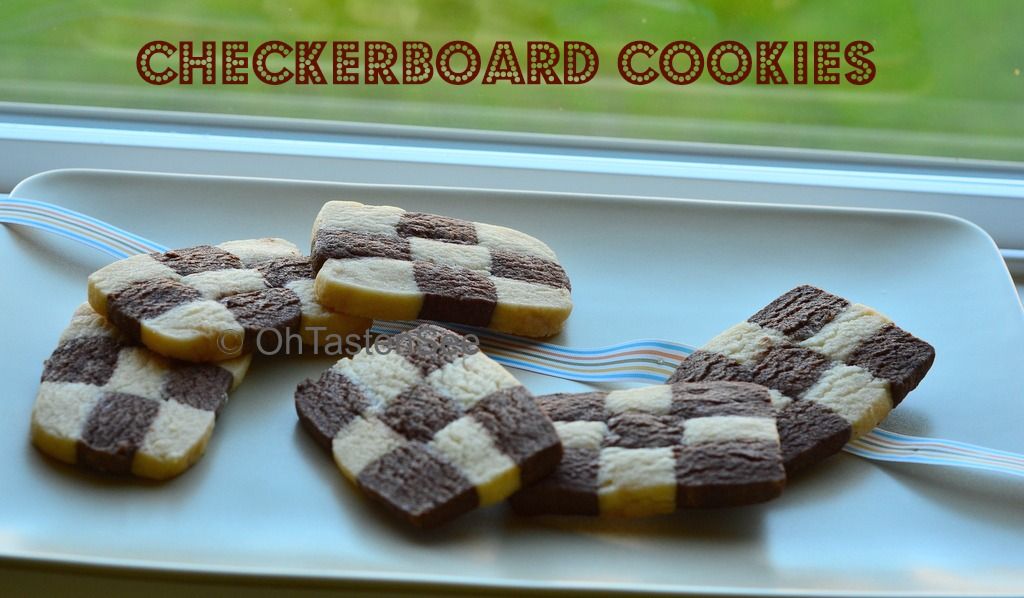
Checkerboard Cookies
Blogging Marathon #40: Week 2/ Day 2
Method
Blogging Marathon #40: Week 2/ Day 2
Theme: Evening Snacks
Dish: Checkerboard cookies
For the second day of 'Evening snacks', I wanted to pick something sweet that you could have with your evening tea and came up with 'Checkerboard cookies'. These cookies have a pretty chess board pattern on them, and I have always wanted to make them, but was intimidated by the process thinking that it involved rolling and covering and that it was too complicated. I then came across an easy way of doing this, which is by forming logs of dough and just slicing them and setting them together to form this pattern. I thought it was doable, and tried it out. It is not at all complicated like it looks, although it would wow people if you were to serve it to them. Here is the recipe.

In the bowl, cream butter and sugar until well blended, about 1 to 2 minutes. Add vanilla extract and salt. With mixer on low speed, gradually add flour, scraping down sides of bowl.Remove the electric mixer, the dough will be loose and crumbly. Just like you would knead the dough for chapati, knead the dough so that it comes together in a ball.
Divide the dough in half. Covering one portion of the dough with a damp towel, remove one portion of the dough and form it into a loaf, forming the corners with your fingers. Using the ruler, measure the length and breadth of this dough log. Ideally, you should be getting a 7 X 7 inch log, but I got it to be a rectangle and not a square. Either way is ok. Wrap your dough loaf in plastic wrap and stash it in the fridge.
With the remaining half of the dough, sprinkle cocoa powder and knead until cocoa has been fully incorporated. You will now have a chocolate dough. In the same way you formed the white dough, form the chocolate dough into a rectangle/square loaf. The ruler helps in ensuring that this loaf is also has the same length and breadth as the other one. Form the corners and wrap this dough in plastic wrap. Place this in the fridge to chill for atleast 10 - 15 minutes.

Preheat oven to 350 degrees. Line two baking sheets with parchment paper.
Make an egg wash by beating the egg with a tbsp of water. Set aside with a pastry brush.
With the vanilla dough log, slice it vertically into 3 3/4 inch slices. Then, cut each slice into 3 3/4 inch strips, making a total of 9 3/4 inch strips. Repeat the same with the chocolate dough log as well, making 9 3/4 inch strips of chocolate as well.
Now, its assembly time: Place one vanilla strip, chocolate strip and vanilla strip. Press with your fingers to bind them. Brush the surface with egg wash. Top it with a layer of chocolate strip, vanilla strip and chocolate strip. brush again with egg wash to help with binding, and top with the third layer of vanilla strip, chocolate strip, vanilla strip. You will now have a loaf that is ready to form a checkerboard. Wrap this again in plastic wrap and put it back in the fridge while you assemble the second loaf.
If you have noticed, the first loaf uses 5 vanilla strips and 4 chocoalte strips, the second one will use 5 chocolate strips and 4 vanilla strips. The first row is chocolate strip, vanilla strip, chocolate strip. Press to bind, brush with egg wash. Top with vanilla strip, chocolate strip, vanilla strip. Again press to bind, brush with egg wash. Top with chocoalte strip, vanilla strip and chocolate strip. Wrap in plastic wrap and refrigerate for 10 minutes.
When the dough has chilled enough, pull out your dough loaf and slice using a very sharp knife to form 1/4 inch slices. You will see the checkerboard pattern now. You can place this on the prepared cookie sheet and bake for 10 to 12 minutes or until the color just becomes golden around the edges. Remove the baking sheet from the oven and let cool for 2 minutes. Transfer to a wire rack to cool completely.

Verdict: These cookies are not only great to behold, but taste amazing as well. There is a great balance between the vanilla and chocolate flavors, plus the cookies aren't too sweet, which I love. They are perfect with a cup of tea!Notes:Eggless baking tip: If you don't want to use eggs for the binding, you can just use water and brush it on top of the layers. Press the next layer a little bit so that it sticks to the next layer. Chilling the dough also ensures it will hold together.
Make Ahead Tip: To have ready to make checkerboard cookies, or to bake only a few cookies at a time, proceed with the recipe as above, but instead of baking in the oven, place the cookie sheets in the freezer for 30 minutes. In a freezer safe container, stack the frozen cookies, separated by parchment paper. You can bake 2 cookies or 4 cookies or how many ever you want to enjoy warm cookies out of the oven.

Comments
Loading comments…